(Original Tutorial by Didik Wijaia)
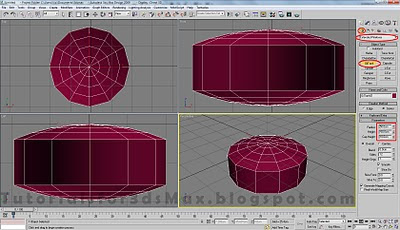
Step 1: Reset 3ds Max from File-Reset. Select Oil Tank form Extended Primitives drop down menu in the Geometry category. Press "T" on your keyboard to switch your viewport to Top, click and drag to create the Oil Tank. After you created the Oil Tank go to Modify Tab and change the setting like this: Radius-50, Height-50, Cap Height-10.
Step 2: Now using the Select and Non-uniform Scale tool, scale down in the Top viewport on the vertical axis until you get something like an ellips.
Step 3: Now convert the Oil Tank to Editable Poly, to do this right click on it and select "Convert to Editable Poly". Active Polygon(press 4 on your keyboard) selection in Selection rollout. Select the middle and top polygons and delete them by pressing "DEL" on you keyboard.
Step 4: Again with Polygon(press 4 on your keyboard) selected in Selection rollout, press Ctrl+A on your keyboard to select all polygons. Using Select and Move Tool hold shift and move them up a little bit to duplicate our selection. With the duplicated polygons selected press Flip to flip our polygons to normal, they must face upward.
Step 5: In Selection rollout change the selection to Boarder(press 3 on your keyboard). To select out 2 boarders together hold down CTRL or simply prea Ctrl+A to select them all. In the Edit Boarders rollout menu click on Bridge.
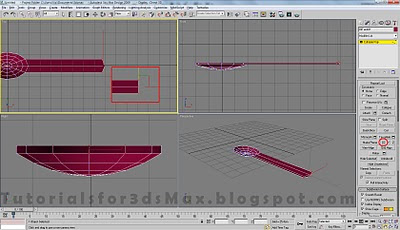
Step 6: Change the selection to Polygon(press 4 on your keyboard). Select two polygons like in the image below. In Edit Polygons rollout click on the small square right next to Extrude button an enter the desired amount, in this case i have chose 180.
Step 7: Now we must change the selection to Vertex(press 1 on your keyboard), select the vertices on the right-most side and in Edit Geometry rollout click on "X" to make them planar. You can see that our vertices are now aligned.
Step 8: Select Edge(press 2 on your keyboard) in selection rollout, in top viewport, with Select Object selected click and drag to select all edges like in the image below. Now select the Connect button in Edit Edges rollout, chose 4 Segments and press Ok.
Step 9: Change selection to Vertex(press 1 on your keyboard) and using the Select and Move Tool and Select and Non-uniform Scale Tool move and adjust the vertices like in the image below.
Step 10: Change selection to Edge((press 2 on your keyboard) and add more edges(select and connect as learned in step 8) to your spoon like in the image below:
Step 11: Press 1 on you keyboard to change the selection to Vertex. Select the vertices on the right like in the image below. Click on the "+" sign next to Soft Selection the expand the menu. Check the box next to "Use Soft Selection". Change the Fallof to 150 and the bubble to 3. In the Front viewport("F" on your keyboard to activate it) move the vertices up like shown in next image:
Step 12: Change selection to Edge and select the edges by holding down CTRL and clicking on them like in the image below(12 edges). After all the edges are selected click on Loop in Selection rollout. Now all are needed edges are selected.
Step 13: With our edges selected press on Chamfer button and select the desired amount and press OK , in this case i've chose 0.406. You can see the result below:
Step 14: Now for the final step simply add a MeshSmooth Modifier form the Modifier List. Change the Iterations to 2 and you're done.
Thanks for following this tutorial


0 comments:
Post a Comment