FINAL RESULT

Step 1
Create an ellipse as shown in the example.
Step 2
Drag a vertical guide to the center of the ellipse. Drag a horizontal guide and put it a little below the center of the ellipse.
Step 3
Verify if the guides are locked at View Guides (Shift + Command +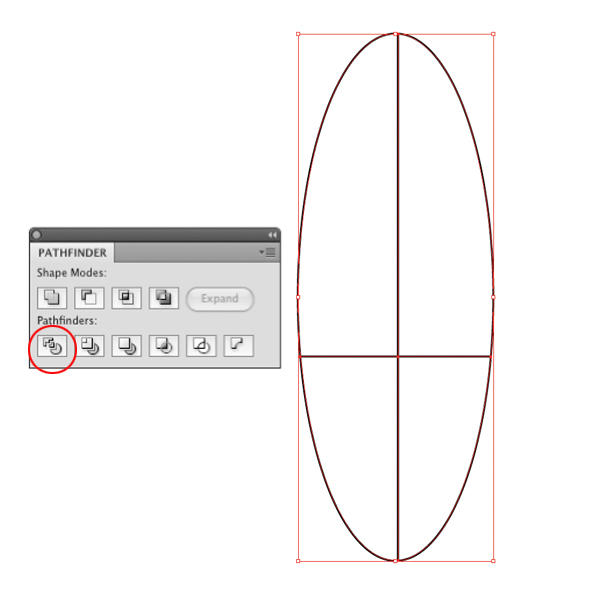
Step 4
Delete three parts of the ellipse, leaving only the superior right part. Fill that part with a red color. That object will be the origin for the rocket body.
Step 5
Use the same technique to create the objects that will be the origin of the rocket wings and the rocket tail
Step 6
Now you will apply a 3D effect on the objects. Start with the main rocket body and the big gray tail area. The gray tail must be placed right below the main rocket body. It’s important to verify that both objects are perfectly aligned at their left side, because the 360 degree axis that will be applied by the 3D effect is based on this alignment
Step 7
Group the two objects (Command + G) and go to Effect > 3D to apply the Revolve option. Rotate the object a little to the right by manipulating the cube image at the options window. When the perspective looks right for you, click OK
Step 8
We’ll now use the effect settings that are now stored in Illustrator’s memory. Select the smaller red object, which has the same form as the rocket’s main body, and go to Effect > Apply Revolve (or press Shift + Command + E). This will apply to the small object the same effect with the same settings used previously on the main rocket body, also keeping the same rotation angle.
Step 9
Now, select the wing object to apply the 3D effect. Apply an Extrude Depth of 5pt. Use the Bevel option to apply rounded corners on the object. Then, apply a Height value of 7pt and press OK
Step 10
Leave the wing above the rocket. Go to the Appearance panel and click twice on 3D Extrude & Bevel to use the 3D configurations. Manipulate the cube at the options window to rotate the wing, setting it in a position that fits nicely with the main rocket perspective.
Step 11
Make a copy of the wing and repeat the same process used previously to set its position.
Step 12
Now you must also make a copy of the small red propeller. Leave each of these propellers at the wings extremities.
Step 13
Now we’ll create the elements for the rocket sticker. You can use geometric forms like the ones used on the example or you can create your own sticker. Remember that its possible to drag to the Symbols panel many elements like images, fonts, patterns, etc. Select the element you will use and, in case you want more than one element, drag one at a time to the Symbols panel
Step 14
Select the rocket body and access the effect settings through the Appearance panel. Click on Map Art in the options panel. In Surface, you can navigate through all the mapped parts of the effect. Keep the Preview box enabled and choose the rocket body area where you want to apply the sticker. In Symbols, you have access to stickers saved previously. Click on a Symbol sticker to apply it to the map
Step 15
To apply the same lighting effect of the rocket to the sticker enable the Shade Artwork box, which is located below the map visualizer.
Step 16
Apply some bolts to the gray rocket tail while still in Surface.
Step 17
Let’s create the rocket hatch. Use two juxtaposed circles. One must be bigger than the other. Center these objects, select them both and go to the Pathfinder panel to apply the Minus Front effect. To create a smaller ellipse make a hole in the bigger ellipse by creating a ring. Fill that new object with yellow.
Step 18
Select the yellow ring and go to the 3D Extrude & Bevel Options. Change the settings in order to adjust the hatch perspective in relation to the rest of the rocket. Also make sure that the lights on the hatch match the lights on the main rocket surface
Step 19
Now we’ll create the dark screen of the hatch. Make a circle filled with black. Then, make a bigger ellipse without a fill color over the black circle. Position this ellipse in order to create an intersection area between the two objects.Select both objects, go to the Pathfinder panel and select the Divide effect. This next part will make the bigger ellipse. Create a division on the black circle surface. Select the superior part of the black circle and apply on it a black and white gradient. Make sure that the white part of the gradient starts at the center and the black part ends at the border. Now you must group both parts of the circle

Step 20
Go back to the 3D settings and use the Position resource to leave the black screen above the center of the hatch.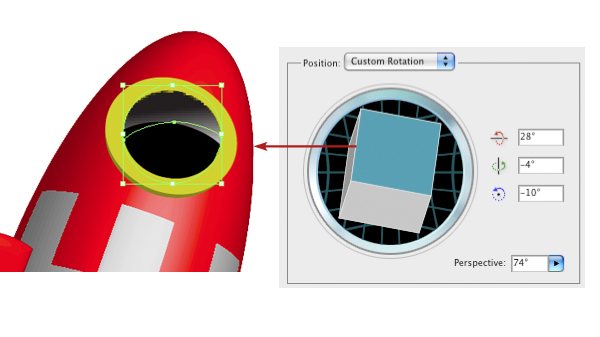
Step 21
To create a light effect above the rocket fuselage, make an ellipse part just like in the example, and position it above the rocket
Step 22
Apply on the object a gradient composed of white and opacity zero. This creates a subtle light that makes your illustration more interesting. Apply reduced copies of this gradient in other parts of the rocket, as shown in the example
Step 23
Reinforce the illusion of depth on the rocket by darkening the main body borders. Go to Effects > Stylize > Inner Glow to create a smooth halo around the selected object. For the color options, choose black and for the Mode choose Multiply. Enable the preview mode and choose an Opacity that fits your style. Repeat the process on other parts of the rocket
Step 24
To create a flame that exits the rocket, you can use a flame shaped symbol already present in Illustrator. To access it go to the submenu in the Symbols panel, enable the Open Symbol Library option and activate the Nature library. Click on the flame symbol and drag it onto the main document
Step 25
Give the flame symbol a Vertical Flip. Go to the main menu and click on Break Link to transform the symbol into a form.
Step 26
Create the effect of extreme movement on the flames by using Effect > Blur > Radial Blur. Position the Blur Center at the top of the preview. Choose an Amount value of 70.
Step 27
Maintain the object selected and at the main menu in Object activate the Expand Appearance option. Now rotate and position the flame at the exit of the big gray propeller.
Step 28
Now we’ll create the universe! Start by creating a layer below the finished rocket layer, then make a rectangle filled with black
Step 29
Access the Star tool in the Tools panel and make a small star filled with white over the black rectangle
Step 30
Drag the star inside the Brushes panel and create a new brush with the Scatter Brush option.
Step 31
Use the Brush Tool loaded with the new Star Brush to create a line of small stars over the black background
Step 32
Maintain the brush stroke selected and click twice on the Brush icon to activate the options panel. Now change all the panel attributes by using the Random option. Exaggerate the Scatter attribute in order to make the stars well scattered


wwooow... i like the colour, shape and glow. looks so great. nice in very :)